Is your shower experience being compromised by a stubborn Delta shower handle that just won’t budge?
Whether you’re looking to perform some general maintenance, troubleshoot issues, or prepare for a replacement, learning how to remove Delta shower handles adequately is an essential skill.
This guide is designed to provide you with the knowledge to remove a Delta shower handle efficiently and without causing any unwanted damage.

How To Remove Delta Shower Handles? A Step By Step Guide
Tools You Will Need
Before you begin the removal process, it’s critical to have the right tools at your disposal. Typically, you might need:
- An Allen wrench, usually a small-sized one that fits the set screw of the handle.
- A screwdriver, possibly both flat-head and Phillips depending on the screws present.
- Slip-joint pliers for any stubborn components.
- A cloth or rag to protect the finish when using tools.
Gathering these tools beforehand not only makes the job easier but also helps to prevent the frustration of having to stop midway to locate the right tool.
Identifying Your Handle Type
Delta shower handles come in different types and designs, including ones with set screws and others that are snap-on. Understanding your handle’s design is paramount to removing it without hassle.
The set screw type is commonly secured by a screw underneath a decorative cap, while a snap-on handle is clipped in place and usually does not require tools to be removed.
Locating the Set Screw
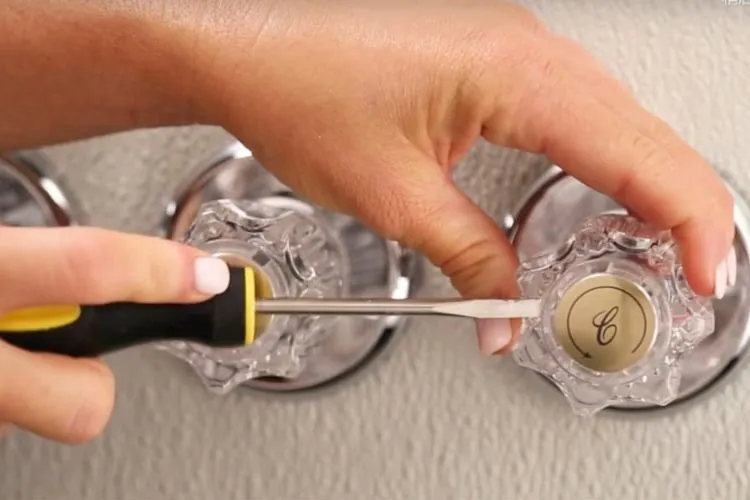
If your Delta shower handle has a set screw, you’ll often find it hidden beneath a small cap located on the side of the handle. This cap might be skillfully blended into the design, camouflaging it against casual observation.
To access the set screw, gently pry off the cap with a flat-head screwdriver, taking care not to scratch the handle’s surface.
Removing the Handle
Once the set screw is visible, use an Allen wrench to turn the screw counterclockwise. It’s important to apply enough force to turn the screw but not so much that you strip it. When the set screw is loose, you should be able to slide the handle off the stem.
If you’re working with a snap-on type, gently pry the handle away from the mount. In some cases, it may be necessary to wiggle it slightly to release the grip of the clip.
What If the Handle Won’t Come Off?
Sometimes, you might find that the handle doesn’t come off as easily as it should. If you encounter resistance, refrain from applying excessive force, which could damage the handle or the plumbing. Instead, try these techniques:
- Apply penetrating oil around the set screw and wait for a few minutes to allow it to work into any corrosion that may be causing the issue.
- Reattempt to remove the handle after letting the oil sit, using the same methods described earlier.
Cleaning and Maintenance Once Removed
With the handle removed, take a few moments to inspect the area for mineral deposits or corrosion. Cleaning the components can prolong their life and ensure smooth operation. Use a mild cleaner and avoid harsh chemicals that might damage the finish.

Reinstalling the Handle or Replacing It
When you’re ready to replace or reinstall the handle, make sure that it aligns properly with the stem before securing the set screw. If the handle is a replacement, follow the manufacturer’s instructions for installation to ensure proper function.
Safety Precautions
When undertaking DIY projects such as removing a Delta shower handle, prioritizing safety cannot be overstated. The foremost step before starting any work on plumbing fixtures is to turn off the water supply.
This precaution prevents the risk of water damage in your home and reduces the chance of unexpected water flow that could lead to injuries or cause a slip hazard in your workspace. Water shutoff valves are typically located near the shower itself or at the main water supply line to your home.
Using the correct tools in the right manner is equally critical. Misuse of tools not only poses a risk of damaging your Delta shower fixtures, potentially leading to costly repairs, but also increases the risk of personal injury.
For instance, using a wrench or pliers without protective cloth can mar the finish of your fixtures, while incorrect use could slip and cause bruises or cuts. Always wear protective gloves to safeguard your hands from sharp edges and ensure a better grip on tools.
Equally important is understanding your limits. If you encounter resistance that requires excessive force, it may signal a deeper issue that warrants a professional look. Forcing components can result in broken parts or, worse, damage to your home’s plumbing system.
Furthermore, ensure your workspace is well-lit and free from obstacles to avoid trips and falls.
Adhering to these safety precautions not only ensures a smoother process but also safeguards your well-being and the integrity of your plumbing fixtures.

Frequently Asked Questions (FAQs)
How can you identify the model of a Delta shower handle?
Check under the handle or on the base for model numbers, or take a photo and compare it with models on the Delta website.
What size Allen wrench is needed for Delta shower handles?
Most models use a 1/8-inch Allen wrench, but always verify with your specific model’s manual.
How often should Delta shower fixtures undergo maintenance?
Inspect and clean your Delta shower fixtures at least once a year to ensure smooth operation and longevity.
Can a stripped set screw on a Delta shower handle be removed?
Yes, using a screw extractor or carefully drilling out the screw can remove a stripped set screw.
What should you do if the Delta shower handle is stuck after removing the set screw?
Apply penetrating oil around the base, wait a few minutes, then gently wiggle the handle to loosen it.
Conclusion:
Removing your Delta shower handle is a process that might seem daunting at first, but with the right tools and steps, anyone can accomplish this task.
Always remember to consult the specific instructions for your model, and if difficulties persist, don’t hesitate to call in a professional.
In conclusion, the content above provides a thorough start towards an accurate, practical, and informative resource that will help readers through the process of removing a Delta shower handle.


